 5698
5698
Genetec's Omnicast and Synergis software is used for video surveillance and door access control, respectively.
Genetec offers three ways in which people can access this security platform - the Security Desk for Windows, the Genetec Web Client and the Genetec Mobile app. Security Desk is issued to security team members, while the Genetec Web Client and Genetec Mobile app are available to all system users. All three methods of accessing our Genetec system requires one's SSO credentials.
All cameras within the system record at one frame per second. Upon motion detection, cameras then record at 8 to 12 frames per second in order to record footage in greater detail. The camera system retains footage for approximately 21 days, depending on how much footage is made available. Note that the system deletes the oldest video in order to ensure space is available for ongoing footage recording. Door related activity is retained for 30 days.
The guides below are broken into three sections, the Genetec Security Desk introduction is first, followed by the Genetec Web Client and ending with the Genetec Mobile app.
Genetec Security Desk
Use the Sign in with Azure SSO button to log into Security Desk.

The Tasks section offers commonly used sections of the Genetec system.
Monitoring is where you find surveillance cameras listed by building and floor.
Maps allows you to view exterior views and building floor plans, complete with camera and door objects placed as per each device's respective physical location.
Alarm monitoring is used to investigate various system alarms, as well as review past alarms that had been triggered within the system.
Cardholder management allows for managing and issuing ID badges to individuals.
Credential management is used for managing ID badges which had previously been issued.
Door activities can be used to review entry at particular doors, or to investigate door related problems.
Alarm report allows for reviewing present and past alarms that had been triggered within the system.

Within Monitoring, the district is broken down by building and floor. Camera views are found here, allowing for live viewing and playback of video footage.

Cameras can be placed into views that you create, allowing you to access the camera footage most important to you in the arrangement that suits you best.

After finding desired cameras from the object tree and placing them in the tiles as you see fit, click Save as in order to complete your personal views.

Name your personal view and click the Save button.

Click on the Security Desk heading, then select the Private tasks section to reveal your personally created views.

Cameras in your private views, as well as the administrator-created views, offer controls to the right of the screen for playback. Select the time frame of interest and review the recorded footage, shown in green, which indicated motion detection.

After selecting the time frame of interest, you can export video in one of several formats.

Name the file to be exported, select the desired format and add a description. The MP4 file format plays on Mac and PC, as well as other operating systems (in most cases MP4 should be used). The G64 format is also available, which packages a scaled-down Genetec video player with the export file, allowing outside law enforcement Genetec-like controls when reviewing exported footage. Using the naming format: camera, date, brief description; for example: da-100-2025-09-17_Missing Paper.

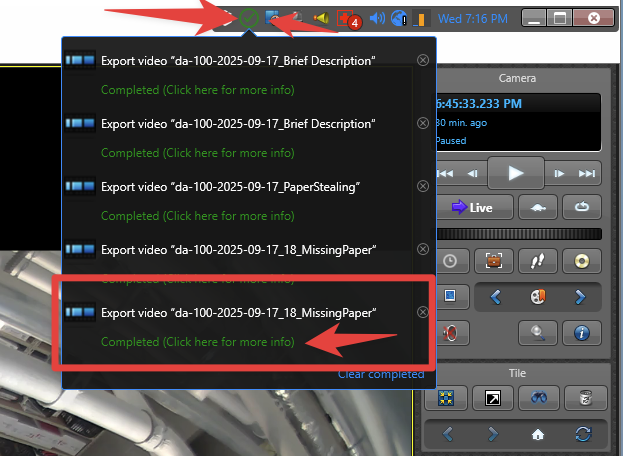
Click on the Completed Task icon in the top right-hand corner of the screen, then click on Completed (click here for more info).

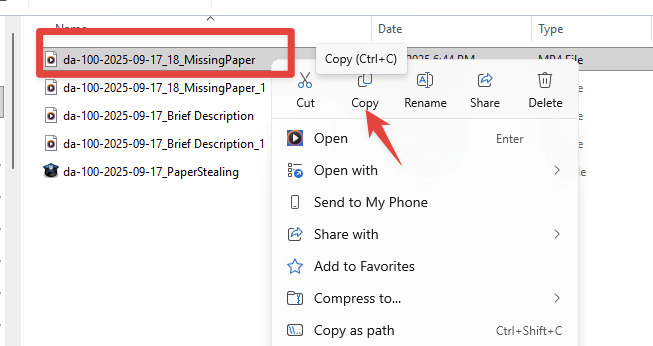
Double-click on the incident video.

Right-click on the file then click Copy.

Navigate to Google Drive G:\, Shared drives - Security - Security Films (pick the type of incident Staff or Student), then pick the building. Right-click and click Paste.

You will NOT have to share with principals. Once you place the MP4 File in the building folder, the principals will have access by going to Staff Links
and clicking on Security Footage, or by going directly to: https://go.uscsd.org/security.

The webpage looks like the following, and they will click on the folders to access the footage:

Maps is the section that offers exterior aerial views of each building and field, as well as blueprints within each school district location. Select from the listed locations to begin using Maps.

District locations are broken down by building and floor. Doors can be controlled in Maps, allowing you to lock, unlock and override door schedules.

Live and recorded camera footage can be viewed while in Maps.

Alarm monitoring is a place where active and inactive alarms can be investigated and reviewed. Camera views associated with selected alarms are also presented.

Cardholder management allows you to issue new badges and assign Cardholder groups, which define which doors an individual can access and at what times that access is granted. Account deactivation and expiration is also managed here.

Door activities can be used to review events at particular doors and at particular times. You can also select a person of interest and investigate all associated door events. Camera footage is presented if a respective door has an associated camera. Note that most doors have two cameras associated, one offering an outside view and another camera offering the inside view.

Alarm report is used to review alarms and study patterns in alarm related activity.

Genetec Web Client
Our Staff Links page (https://www.uscsd.k12.pa.us/stafflinks) lists the link for web client login. Select the Sign in with Azure SSO button to login.

We make use of the Monitoring, Door Activity, Alarm report and Access configuration.
Monitoring is where you find surveillance cameras listed by building and floor.
Door activity can be used to review entry at particular doors, or to investigate door related problems.
Alarm report allows for reviewing present and past alarms that had been triggered within the system.
Access configuration allows for managing ID badges previously issued to individuals.

Within Monitoring, the district is broken down by building and floor. Camera views are found here, allowing for live viewing and playback of video footage.

Camera layouts offer groupings of the cameras on our system.

Door activity allows you to review door related events at specific times and for specific doors.


During door event review, associated camera footage can be investigated as well.

Alarm report offers a place where active and inactive alarms can be reviewed.

Access configuration gives the opportunity to search for people and review access granted to individuals.

Genetec Mobile app
Review installing, setting up and logging into the Genetec Mobile app here - https://support.uscsd.k12.pa.us/kb/article/519-genetec-camera-system-access/.
Favorites is a place where you can add the cameras most important to you.
After tapping the Add Favorites button, you can search for cameras that you'd like brought to the forefront of the mobile app.
Cameras added as favorites become visible and easily accessible from your Favorites.
Maps will bring you to the location selection screen.
The district is broken down into buildings and fields.
Door and camera objects are accessible and offer monitoring and controls.
Each location is broken into exterior aerial views and floor plans, allowing you to easily locate particular cameras and doors of interest.
Area view offers camera access whether for viewing live footage or recorded video.
Area view is broken down by location, then into exterior and floor views.
Select from pre-defined groups of cameras offered in Layouts.
Alarms allows you to review active and inactive alarms for which you are a recipient.
Filtering on the listing of alarms can be helpful in order to find particular entries of interest.


